Sunday, November 27, 2011

The Benefits of Raw Milk

This is not a post to get you drinking animal milk if you don’t already. Humans are the only species that continue to drink milk after weaning, and act that in reality is unnecessary. See: http://www.celestialhealing.net/milkpage.htm this site correctly states that: The Biggest problem with cow’s milk is that the protein in the cow’s milk damages the human immune system. Amino acids, the units that make up proteins, are building blocks for all living cells. When amino acids in our food are properly broken down by the digestive system into protein, it does no harm to the immune system. Protein from milk, however, is absorbed into the blood fully indigested, provoking an immune response. Repeated exposure to these proteins disrupts normal immune functions and may eventually lead to diseases.
This is true when it comes to our typical consumption of store bought pasteurized mil
k. Raw milk on the other hand
contains its full complement of enzymes and lactase-producing bacteria needed by our bodies to break down and assimilate the milk sugar lactose. These helpful bacteria are killed in the pasteurization/homogenization process.

There are 60 plus (known) fully intact and functional enzymes in raw milk, each one of them essential in facilitating one key reaction or another. Some of them are native to milk, and others come from beneficial bacteria growing in the milk. I believe the most significant health benefit derived from food enzymes is the burden they take off our body. The amylase, bacterially-produced lactase, lipases and phosphatases in raw milk, break down starch, lactose (milk sugar), fat (triglycerides) and phosphate compounds respectively, making milk more digestible and freeing up key minerals. Other enzymes, like catalase, lysozyme and lactoperoxidase help to protect milk from unwanted bacterial infection, making it safer for us to drink.


Here is a link to a report detailing the science and rationale for drinking raw milk http://www.rawmilkcolorado.org/PDF/Why%20Raw%20Milk%20(Acrobat).pdf

If you live in Colorado a great website for information on raw milk or information on how and where you can purchase raw milk is http://www.rawmilkcolorado.org/

If you are not in Colorado I recommend visiting this page if you are interested in raw milk  http://www.realmilk.com/where1.html


References:
Enzyme Nutrition: the food enzyme concept, Avery, 1985. Howell, E. (pp. 4-7)

Farkye, N.Y., 'Amylases' In: Advanced Dairy Chemistry Vol. 1: Proteins 3rd Ed., Academic/Plenum Publishers, 2003. Fox, P.F., McSweeny, P., Eds. (pp. 580-581)

Olivecrona, T., et al, 'Lipases in Milk' In: Advanced Dairy Chemistry Vol. 1: Proteins 3rd Ed., (pp. 473-488)

Shakel-Ur-Rehman, et al, "Indigenous Phosphatases in Milk' In: Advanced Dairy Chemistry Vol. 1: Proteins 3rd Ed., (pp.523-533)

http://www.raw-milk-facts.com/Raw_Milk_FAQ.html

Backyard Chickens

I took on the venture of keeping backyard chickens a little over a year ago, being motivated by a neighbor friend of mine after her family started keeping a small flock. When I took on the project I had no idea how easy and how rewarding it would be! I did a few months of research on raising chicks, building a coop, proper size enclosure etc, and then we dove in. Here’s a quick overview of our experience.

The first step was building the coop; we spent about $120 for all the wood and chicken wire to enclose the chickens into a 15x12 chicken yard, and an afternoon building the coop.
Here is a photo of our chicken yard/coop. We also keep our bunnies in the chicken yard, they get along great with the chickens and they love the freedom to roam around out of their hutches.


After the coop was ready we were ready to get our chicks, we bought them from a local feed store for $1.19 a piece, and we took home 6 of them. The 4-6 month wait for them to start laying eggs was fun and flew by. The kids had so much fun, and learned so much by watching them grow, and helping to feed and take care of them. Now the kids love going out to the coop each day to bring in the loot! After eating store bought eggs all my life the taste of a fresh organic egg from your own chicken just doesn’t compare! We average 4 eggs a day from our girls.

With our current watering system we have to give the girls fresh water once a week. We also use the deep litter method in the coop, in which we just put a couple inches of fresh pine shavings over the poo in the coop once a week; this enables me to only have to thoroughly clean the coop twice a year, spring and fall.

The cost breakdown for upkeep with the chickens is as follows:
-$6 for pine shavings for the coop
-$14 for layer feed 50lb bag
-$0 for calcium supplement, since we save their egg shells, bake them for 10 min. at 350 degrees, crush them and supplement them with that.
-$12 for chicken scratch grains 50lb bag, in the winter months.
These supplies last on average 4 months, for the 5 chickens we currently have.
Total: $8/month, so about $1.25 per dozen eggs we receive.
This is about half, if not less, of what we would spend to buy organic eggs from the store. But the experience alone for our family is better than any amount of savings!

BPA and Its Effects on Our Bodies


BPA and its effects on your body:

BPA also known as Bisphenol A, is found in many plastic containers such as food containers, water bottles and in the lining of canned foods.

The National Toxicity Program has declared that consumers should have reason to be concerned about BPA because it can cause neural problems or behavioral problems in a pregnant woman's fetus as well as problems in infants and older children. Doctors have found that BPA can cause your estrogen levels to rise dramatically, regardless of whether you're a male or female. In males, this can cause prostate cancer and a lowered sperm count. In females, it can cause breast cancer. In children and even infants, BPA has been shown to promote hyperactivity, even promote early puberty in young girls.
BPA is an estrogen receptor agonist. These agonists can begin to mimic the human body's actual hormones which will cause the body to have similar physiological effects. Because of this, there is great concern that when exposed to extended low doses of BPA, it may provoke chronic toxicity in the human body.

Countries such as Canada have conducted their own studies and have declared to classify BPA as inherently toxic. According to Frederick Vom Saal, a BPA researcher and a biology professor at the University of Missouri, heat, acid, alcohol, harsh detergents, age and microwaving can also exacerbate the release of BPA.
Steps we can take to avoid BPA are to limit your use of canned foods and beverages, purchase foods and beverages in glass containers, or buy frozen vegetables. Instead of plastic containers, store your food in glass containers such as Pyrex containers. Defnitely do not heat your food in the micorwave in plastic containers since this causes the chemicals to leach out of the plastic at an increased rate, and i've heard that acidic foods such as tomatoes absorb the BPA from the can lining moreso than a more alkaline food will. Canning your own fruits, jams, tomatoes and sauces is a great way to avoid BPA. Look for a post on canning before next canning season!

See this site with info. on canned tomatoes along with some other great info on eating healthy:
http://wakeup-world.com/2011/10/06/7-foods-experts-wont-eat/

Wednesday, November 23, 2011

How to make a pocket diaper with leg gussets

Since I am spending some of my Thanksgiving holiday upping my cloth diaper stash by sewing some more cloth diapers (currently working on size large pocket diapers) I thought I'd go ahead and take step by step photos for anyone interested in sewing their own cloth diapers. It is a great economical choice, truely you can make an entire cloth diaper stash for under $100 if you are creative and willing to search for a bargain. Majority of supplies can be purchased from second hand stores using fabrics such as recycled baby blankets, flannel sheets, old t-shirts, whool sweaters etc. I went all out with this stash and bought some new PUL material, cute fleece, flannel, a bunch of FOE (fold over elastic), velcro and a few dozen chinese prefolds. But in the end I spent under $200, a HUGE savings over buying disposible diapers over the life of a diapered child and even a large savings of a few hundred dollars over buying my cloth diapers and covers from an online store. It did take me some trial and error since I have VERY little previous sewing experience. I started sewing All In One diapers without leg gussets, but the gussets are great for containging leaks, and I've come to prefer a prefold with a cover, or a pocket diaper over the AIO's because they dry quicker and are easier for me to launder. I developed a pattern I like and even through nursing school and my 4 children I will have all the diapers this baby will need to get her from birth to potty training by the time she is born in February!

First you need to find a pattern. I've found plenty by doing a search for 'cloth diaper pattern' in google, and have modified a few to my liking. This is the one i'm using for my pockets.


You need two layers, a waterproof outer layer, and an absorbant inner layer. I like to use PUL, or fleece for my outer layer, and either flannel or microfleece for the inner layer. Cut out your 2 layers of fabric, and 2 gussets with the outer fabric. I'm using 2 layers of fleece for this diaper.


Next you want to sew your FOE over the straight edge of each gusset, pullig the elastic tight as you sew with a zigzag stitch. (The gussets above already have the FOE sewn on). Then you want to straight stitch the pocket flap down on each fabric layer, leaving a space to thread through a 1/4inch elastic, as shown below.


 After sewing both flaps down, sew both peices of fabric together along the edge right sides out, starting where you've sewn the flap down, and ending at the sewn down flaps. Do not sew over the flaps, this is your pocket to insert the diaper.
                                    
 Once you have your peices sewn together you take a peice of 1/4 inch elastic, do not cut it to any specific length, leave it long, put a safety pin on one side to help thread it through the fold down flaps.


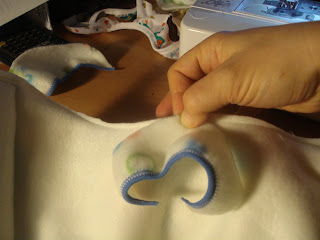
 After you've threaded it through both sides, pull the elastic to tighten the opening and pin the elastic on the other side.You can then cut the elastic.
 It will look like this.
Now sew the elastic that is pinned wtih a zigzag stitch back and forth a few times to secure.

Then cut a loop (soft side) velcro to the length of the front of diaper and sew it in place. I straight stitch around the edge.
 Then sew 2 hook (rough side) velcor tabs onto the inner back side of the diaper, and another 2 loop velcro tabs inside of the hook tabs. (The hook tabs are optional to use to secure the hook velcro durring washing to help prevent it from pulling on your diapers.)
 It is now time to sew the leg gussets onto the diaper. Fold a gusset in half, and the diaper in half from front to back, to find the center of each.
.                                     
Once you have found the center of each then hold the two together like in the photo below and secure with pins along the gusset.
 Once you have it pinned, sew it onto the diaper with a straight stitch along the edge.

 Repeat on the other side, it will look like this when you are done.
 Now it is time to finish off the diaper with FOE all around the edge, leaving the pocket open. So grab your FOE and fold over about 1/2 inch.
 Pinch this over the edge of the diaper right along side the opening of the pocket. It may be easier if you pin it in place, then sew it on. I always stragiht stitch back and forth a few times to secure it real well along the first inch of the elastic.
 Then straight stitch along making sure the elastic is folded over the edge of the diaper.
 Once you reach the leg gusset you want to switch to a zigzag stitch and pull to stretch the elastic as you sew ver the gusset.
 After the gusset swtich back to a straight stitch and continue to sew around the rest of the diaper, repeating the zigzag and stretch over the other gusset. When you reach the pocket, you can cut the elastic about 1/2 inch too long.
 Then fold the excess in and straight stitch back and forth a few times to secure it at the edge.
  You are finished!
 Insert a chinese prefold. (or any absorbant cloth! I have used t-shirts, bibs, and even paper towels from the store bathroom when in a bind having forgotten to bring enough diapers with me).

Here's the final product on my toddler. She's bee using the potty for about 6 months now but her skinny butt fit in to this so she's a great model!